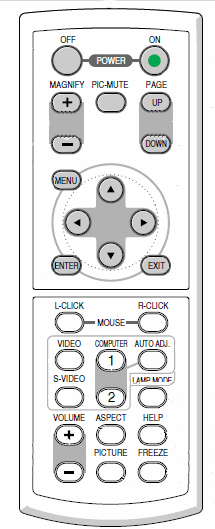
- To turn it ON press the ON button. The projector takes a little time to warm up and reach full brightness, but you will here a 'dee-doop' tone.
- To turn it OFF press the OFF button. A message will appear asking you to confirm. Press the OFF button again to confirm. You will hear a "doo-deep" tone. NOTE - you cannot turn it off until it has fully started. If you try too soon, you will get a message stating that the "function is unavailable". It is VERY IMPORTANT that you turn the projector off when not using it to preserve the bulb life.
- To use the projector to view a DVD, VHS tape, or live TV, press either the VIDEO or S-VIDEO button (I'm not sure why both can be used for the same thing). Then use the LG remote (the black one) to control the channel or video.
- You can display your computer image (from the teacher station only) by pressing the "COMPUTER 1" button
- The PIC-MUTE button blanks the picture temporarily - press it again to restore.
- The FREEZE button will freeze the picture - it does NOT pause the video just freezes the picture. Press again to get the live picture.
- The MENU buttons are used for changing the basic configuration of the projector - something you probably won't need to do.
- Unfortunately, the MOUSE buttons don't do what we'd like (allow you to click for thing like a Powerpoint presentation) without additional equipment. If we get this adapter, these buttons will simulate the corresponding computer keys as well.
- The VOLUME buttons also do not work as we might hope, and there's not much chance they ever will. They control the volume of audio being sent through the projector's internal speaker. Our system sends the audio to an entirely separate system.
- OK - there are a few buttons I haven't described. Don't worry, you probably don't need to use them. If you really want to learn more, here's the manual
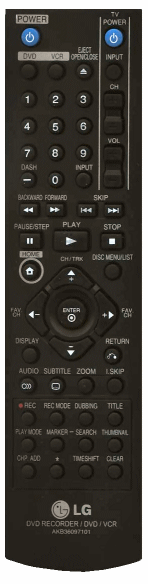
- First of all - completely forget about the TV section. This doesn't work with our TVs or the projector at all.
- The POWER button turns the system on and off. The Audio Controller Box and the Video Projector must be turned on separately.
- TV VIEWING
To view TV, make sure that the audio control (below) is turned on. You may also need to press the INPUT button until it selects the built-in TV tuner (it cycles through tuner/AV1/AV2/CAmcorder). Once you have the Tuner selected you can change channels by using the CH/TRK buttons or by entering the channel number and pressing ENTER.
The channel lineup is limited and determined by the equipment in our media center. If there is a channel that you think we ought to have access to instead of one that is available, please contact the building media specialist or technology coordinator. - Watching a DVD
To watch a DVD, make sure that the audio control (below) is turned on, then press the insert DVD button on the front of the unit (there's also a button on the remote, but since you have to go to the console anyway, that button would be more convenient) and insert the disc. In most cases the DVD will automatically begin playing. If you were previously watching TV, it will automatically switch to the DVD input.
At this point you can use the basic media controls to- PLAY or STOP the video
- PAUSE the video or STEP into it one frame at a time (there will be no audio)
- SKIP forward or backward one chapter Chapters are created when the DVD is created and may be a fixed amount of time or at scene/topic changes.
- BROWSE forward or backward continuously. (no audio)
- Watching a VHS video tape
To watch a VHS video tape, make sure that the audio control (below) is turned on, then press the insert VCR button on the front of the unit (there's also a button on the remote, but since you have to go to the console anyway, that button would be more convenient) and insert the tape. In most cases the tape will automatically begin playing. If you were previously watching TV, it will automatically switch to the VHS input.
At this point you can use the basic media controls to- PLAY or STOP the video
- PAUSE the video or STEP into it one frame at a time (there will be no audio)
- The SKIP buttons do NOT work for tapes - only DVDs.
- BROWSE forward or backward continuously. (no audio)
- Lastly, you cannot view the output from the DVD/VHS player on the old TV. You can only use the TV for live TV viewing.
- OK - there are a few buttons I haven't described. Don't worry, you probably don't need to use them. If you really want to learn more, here's the manual
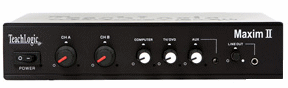
- You cannot control the audio with the remotes - there's not even a mute button, which is a shame.
- In order to get any sound through the overhead speaker system, you have to turn it ON by flipping the POWER switch. You may want to turn this off when you're not actively using it to conserve power as well as prevent unintended audio from being played.
- The first two controls are for the microphone system. Channel A is for the pendant microphone, while Channel B is for the handheld microphone.
- When using the microphones, it is important to understand that they send their signal using infrared light, so the transmitter cannot be covered.
- The microphones have a battery charger base unit. Charging can be performed by just placing the mics in the base. About once every 30-60 days you should remove the batteries and place them directly in the charger then press the discharge button.
- The Computer control is for adjusting the volume of the computer audio - whether that is from an audio CD, a powerpoint presentaion, or some other audio source on the computer. The combination of your computer's volume setting (including its "mute" option)and this control will determine the resulting output, so if you aren't hearing anything, you need to check both this device and the computer.
- The TV/DVD control sets the volume for any audio from the DVD/VHS/Tuner unit.
- The Auxiliary Input control and input jack allows you to connect other audio devices such as an i-pod, or tape player (assuming you can find the correct type of cable).
- Likewise, the Line Out control and jack let's you send the audio out to another device.
- For more information - including info about the wireless microphones, you can find the manual here.


located in B207

located in the Office